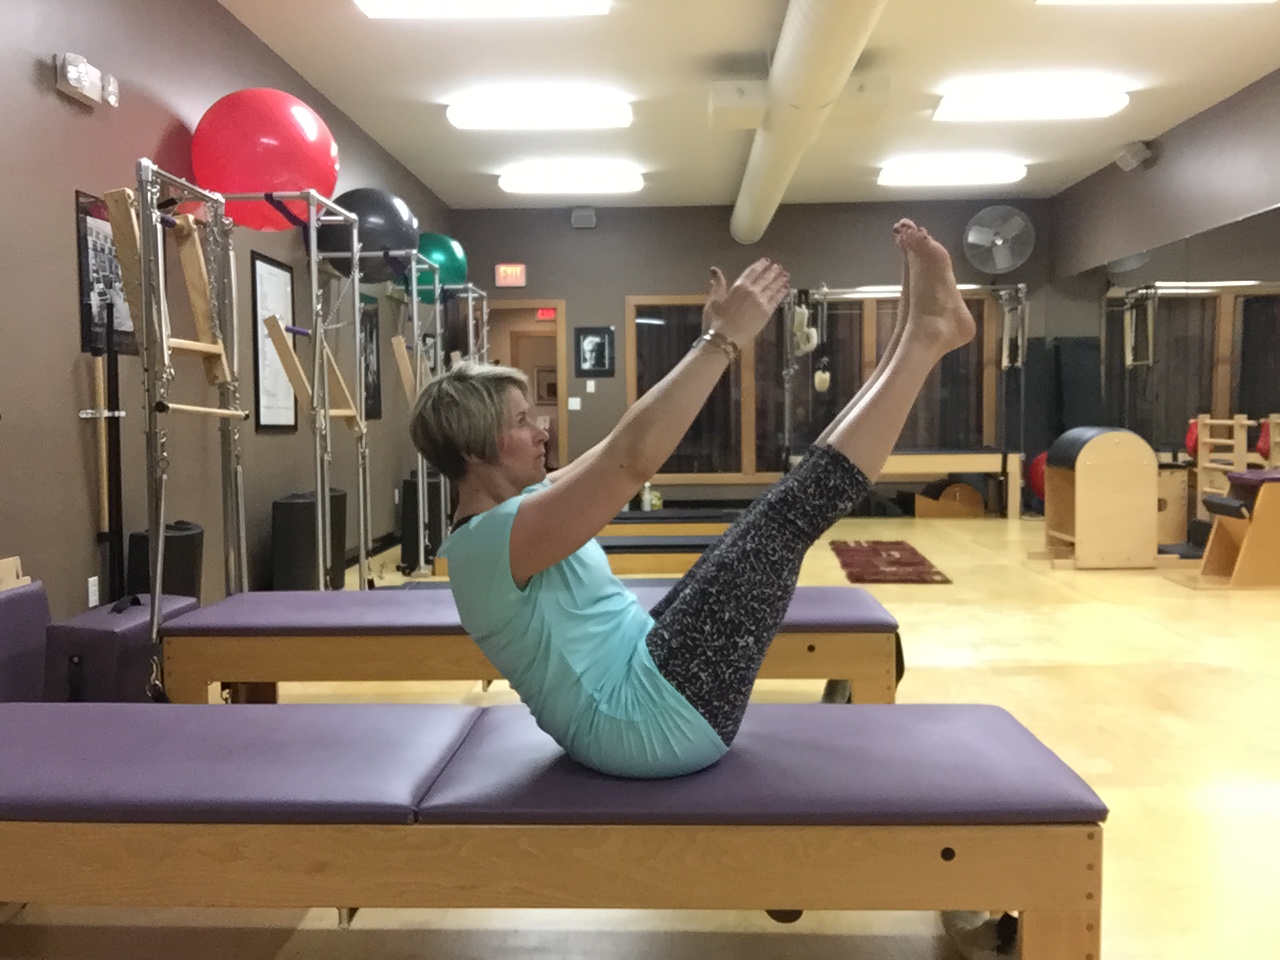
Combine Teaser and Corkscrew and what do you get? Hip Twist with stretched Arms (sometimes called Hip circles too)! This can be an especially challenging exercise that combines many of the skills from previous exercises. To do the full version of this exercise you not only do you need to be able to hold your Teaser, but you need to be open enough through your chest and shoulders to hold your Teaser with your hands pressing into the mat or mat poles behind you. Bending the arms and propping yourself on your elbows can be a great way to build the flexibility and strength you need to work toward the straight arm version.
The Teaser is one of the most famous Pilates exercises and for good reason- it is a challenging exercise that really embodies all of the Pilates principles into one beautiful exercise! The Teaser exercise can also be found in many of the other Pilates exercises…Hundred(low teaser position), Roll up, Roll over, Open Leg Rocker (just a rocking Teaser!), just to name a few…
So what is the key to being able to do a controlled, effortless looking Teaser?( even though it’s a ton of work!)? Here’s a few tips:
Articulation– This is a skill and technique you’ll learn in lots of other Pilates exercise. We are trying to roll through our spine as we come up into the classic Teaser V shape with our body, versus just popping up in one piece. Practicing your articulation in other exercises like roll up and shoulder bridge will help you gain strength and flexibility to do your best teaser!
Breath– fine tuning your breathing will help you fine tune your Teaser. Ideally we are breathing as we are articulating through our spine versus that ever so common hold your breath and try to muscle your way up version! Practicing your breath while articulating in more basic exercises like Roll Up, Rolling Back and Shoulder Bridge will help you prepare for your Teaser breath.
Try practicing your Pilates Teaser with a theraband to help you practice your articulation and breath!!
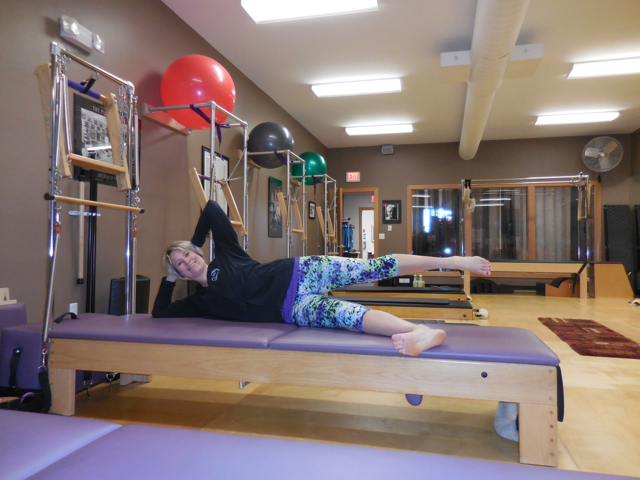
The Pilates Side Kick exercise is a great whole body strengthening exercise that can be done safely by most bodies. When you first do this exercise you may feel like it is a “leg exercise” (and it it) but the stability and lengthening portion of this exercise really comes from your center and those core muscles. After you get set up in a side lying position that works best for your body, you’ll be working to keep your upper body stable(ie completely still!) as you sweep your top leg front to back trying to challenge your balance and stability!
In his book,Return to Life, Joseph Pilates only includes the Side Kick as part of the traditional Pilates Mat routine. Over the years though there have been lots of variations of this exercise that have made their way into the Pilates Mat sequence and we often call this series of exercises the Side Leg Kick series. These exercises are especially great for strengthening the gluteus muscles of the hips as well as the traditional whole body strengthening you get from every Pilates exercise. Check out the video below that teaches a Side Leg Kick routine you can try at home!
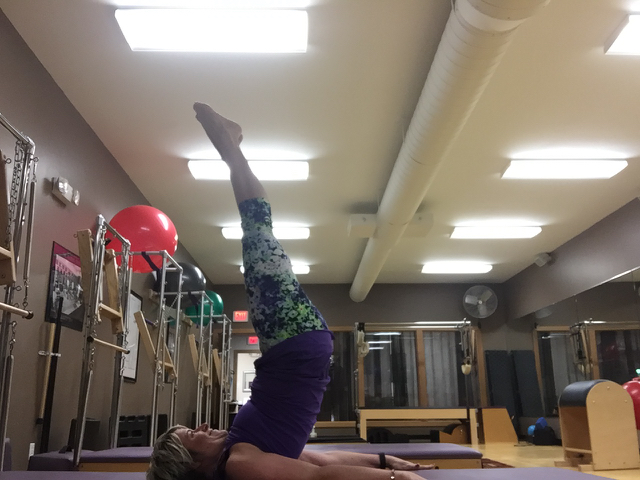
The Jackknife exercise takes articulating through your spine to a whole new level! This challenging exercise has you bring your legs over your head to roll up through your spine to your shoulders, and then you attempt to reach through the back of your legs to pike your legs toward the ceiling. There are lots of benefits to this type of movement in your body but as you may have guessed this is no beginner exercise.
I’m guessing the fact that not a lot of people can do this exercise well without assistance is one of the reasons Joseph Pilates created the Long Spine exercise on his apparatus the Universal Reformer. By putting your feet in straps connected to the moving carriage of the reformer, clients can create the movement of rolling through the spine from your tail up without having to strain and possibly hurt themselves. The Reformer does some of the work of the exercise so that clients can build the whole body strength and flexibility needed to do this movement efficiently and safely.
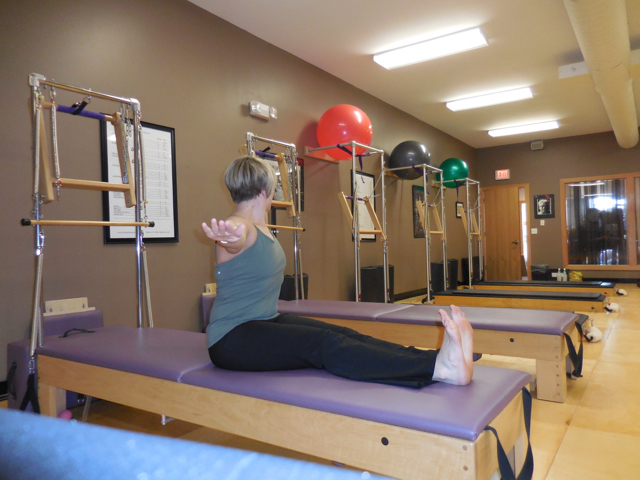
Spine Twist is one of those Pilates exercises that took me years to really “get”. I have to say though now that I get it…I really get it! It is a ton of work and also one of my favorite exercises as I love how I can really feel my oblique muscles engage and work to create my Twist! Here some tips to help you find the work and benefits of this exercise:
Sit upright on your pelvis. If you have tightness in your back and backs of legs this may mean that you have to bend your knee some or even better sit on something that raise your hips slightly above your heels ( a Yoga brick or a foam roller can work great). After you find the feeling of sitting right on top of your sitting bones as tall and lengthened as you can stretch your arms out into a T shape.
Take a big, expansive chest expanding inhale before you move and then use your exhale to twist your rib cage to one side. Try what I call a triple exhale which Joe describes in Return to Life as: “Twisting the body and turning the head to the side as far as possible, then with two further supreme mental and physical efforts, strive to better your original first attempt”. ( I love his words, “With two further supreme mental and physical efforts!!!”)
Very much like our Pilates Saw exercise this exercise demands that your lower half of your body works to anchor your hips in place so that you can create an effective twist that comes from those core muscles. When you twist you shouldn’t shift or even move in your hips or legs.
Joseph Pilates suggests 3 repetitions on each side in Return to Life.
The Pilates Shoulder Bridge exercise is a great whole body strengthening exercise that teaches us how articulate through our spine and just plain feels good! This is such a great exercise for any body. As your practice advances you can challenge your strength and your ability to strengthen by holding in the bridge and then eventually adding a bent knee fold, and then adding a kick with 1 leg. Here’s a few tips:
Start by tucking the pelvis and really initiate this movement from your tail end. When you do this you will start to feel a stretching and lengthening of your low back.
Try to roll up from the mat one vertebrae at a time versus just lifting everything in one piece.
When coming back down to the mat, focus on leaving your hips lifted as you start to connect you very upper back to the mat and continue to sequence your back to the mat one vertebrae at a time.
Notice any spots in your back/spine that are a challenge to move through and connect into the mat. In those places I like to focus on the front side of my body pulling in toward my spine to help me get more movement.
Inhale the entire time you are rolling up to your shoulders and then exhale the entire time you are rolling down
Work your way to the kick by first just practicing holding the bridge at the top. Then progress to a 1 leg knee fold while maintaining your lifted bridge position. Then you can progress to stretch the leg straight and trying some kicks as you hold the position.